Managing a WordPress website requires careful attention to URLs to prevent broken links, maintain traffic, and protect search engine rankings. Properly handling 301 redirects in WordPress is a key part of this process, especially when updating pages, removing content, or restructuring your site.
In this guide, we’ll explore why 301 redirects in WordPress matter and provide practical steps to implement them correctly, ensuring your site remains organized and SEO-friendly.
Understanding 301 Redirects in WordPress
A 301 redirect in WordPress is a permanent redirection from one URL to another. When someone requests the original URL, they are automatically sent to the new location, ensuring users never encounter broken pages. Unlike temporary redirects, a 301 redirect transfers most of the SEO value from the old URL to the new one. Implementing these correctly in WordPress is essential for maintaining site organization, preserving link equity, and preventing disruptions when pages are updated, removed, or reorganized.
Beyond preventing broken links, it plays a critical role in SEO and user experience. They guide search engines to index the new page while retaining the authority of the old URL, helping maintain rankings during site changes or migrations. For visitors, it eliminates 404 errors and frustration, keeping engagement high and navigation seamless.
Common Scenarios That Require 301 Redirects in WordPress
- Changing permalinks: Updating URL structures to make them more SEO-friendly or readable requires setting up redirects from old URLs to new ones to avoid broken links.
- Deleting or merging content: When a page is removed or merged with another page, a 301 redirect ensures visitors are redirected to a relevant page instead of encountering a 404 error.
- Migrating to HTTPS: Moving from HTTP to HTTPS requires site-wide redirects to ensure all traffic is securely routed and indexed under the correct protocol.
- Changing domains: When moving to a new domain, 301 redirects help transfer traffic and preserve search engine rankings by pointing old URLs to their new equivalents. Using a hosting provider optimized for WordPress can make this process smoother and ensure your redirects function reliably.
- Fixing broken links: Redirects can recover traffic from outdated or incorrect links, whether they come from internal pages or external websites linking to your content.
Set Up 301 Redirects Using a Plugin
This method is ideal for users who want a safe, visual interface without editing server files. Plugins provide logging, easy management, and reduce the risk of errors.
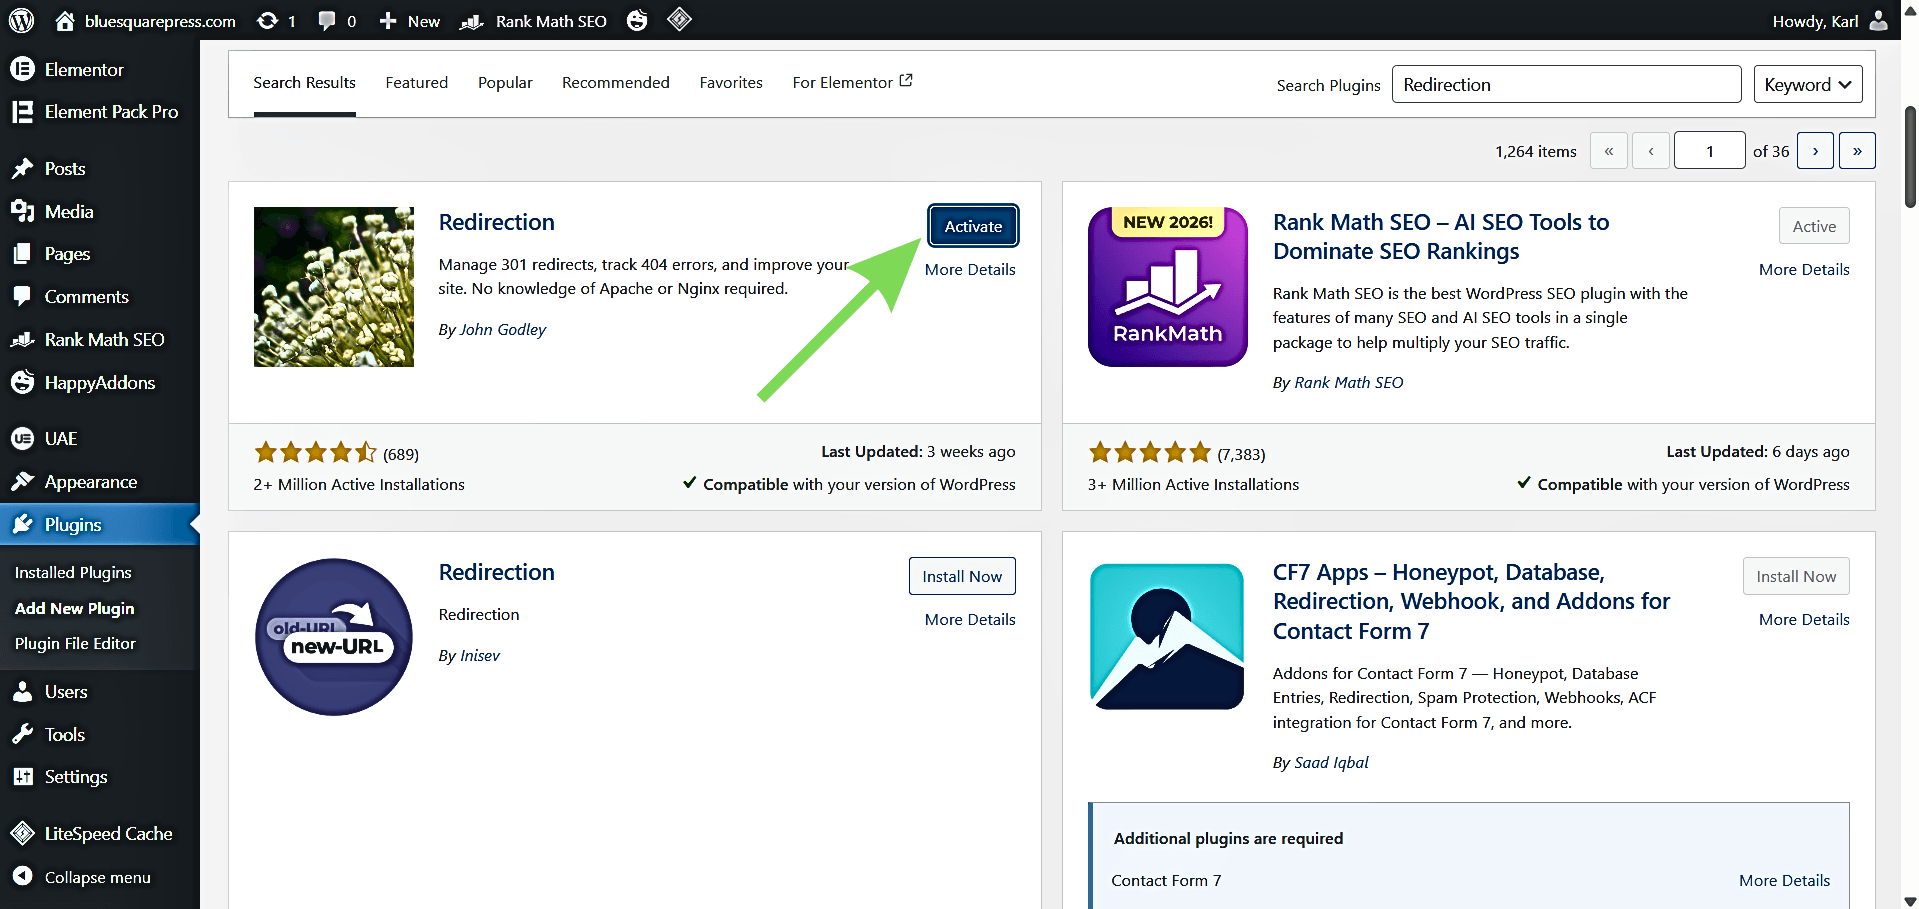
Step 1: Install the Redirection Plugin
Go to Plugins, then Add New, search for “Redirection” by John Godley, then click Install, then Activate.
Step 2: Complete the Setup Wizard
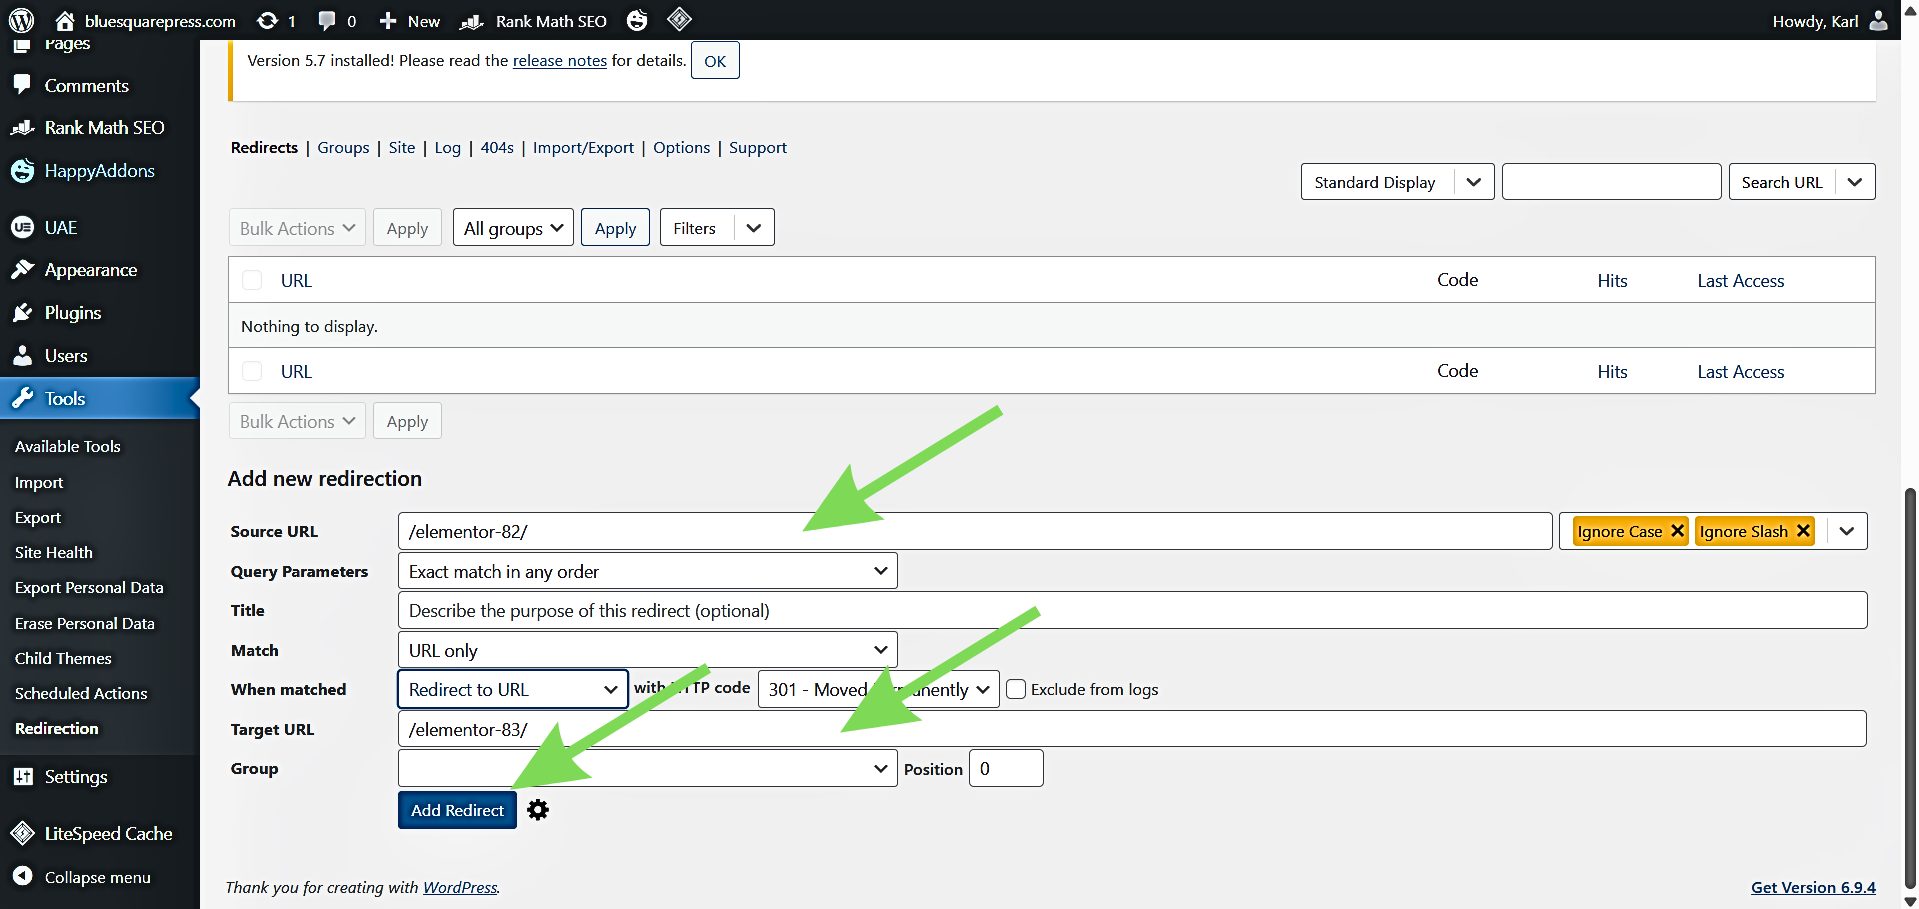
Navigate to Tools, then Redirection, then follow the setup wizard. Default settings are sufficient for most WordPress websites and will properly initialize the plugin.
Step 3: Add a New Redirect
Click Add New (or Add Redirect). In Source URL, enter the old page path (e.g., /old-page/). In Target URL, enter the new URL (e.g., /new-page/ or https://example.com/new-page/). Keep the default group (“Redirections”) and click Add Redirect to save.
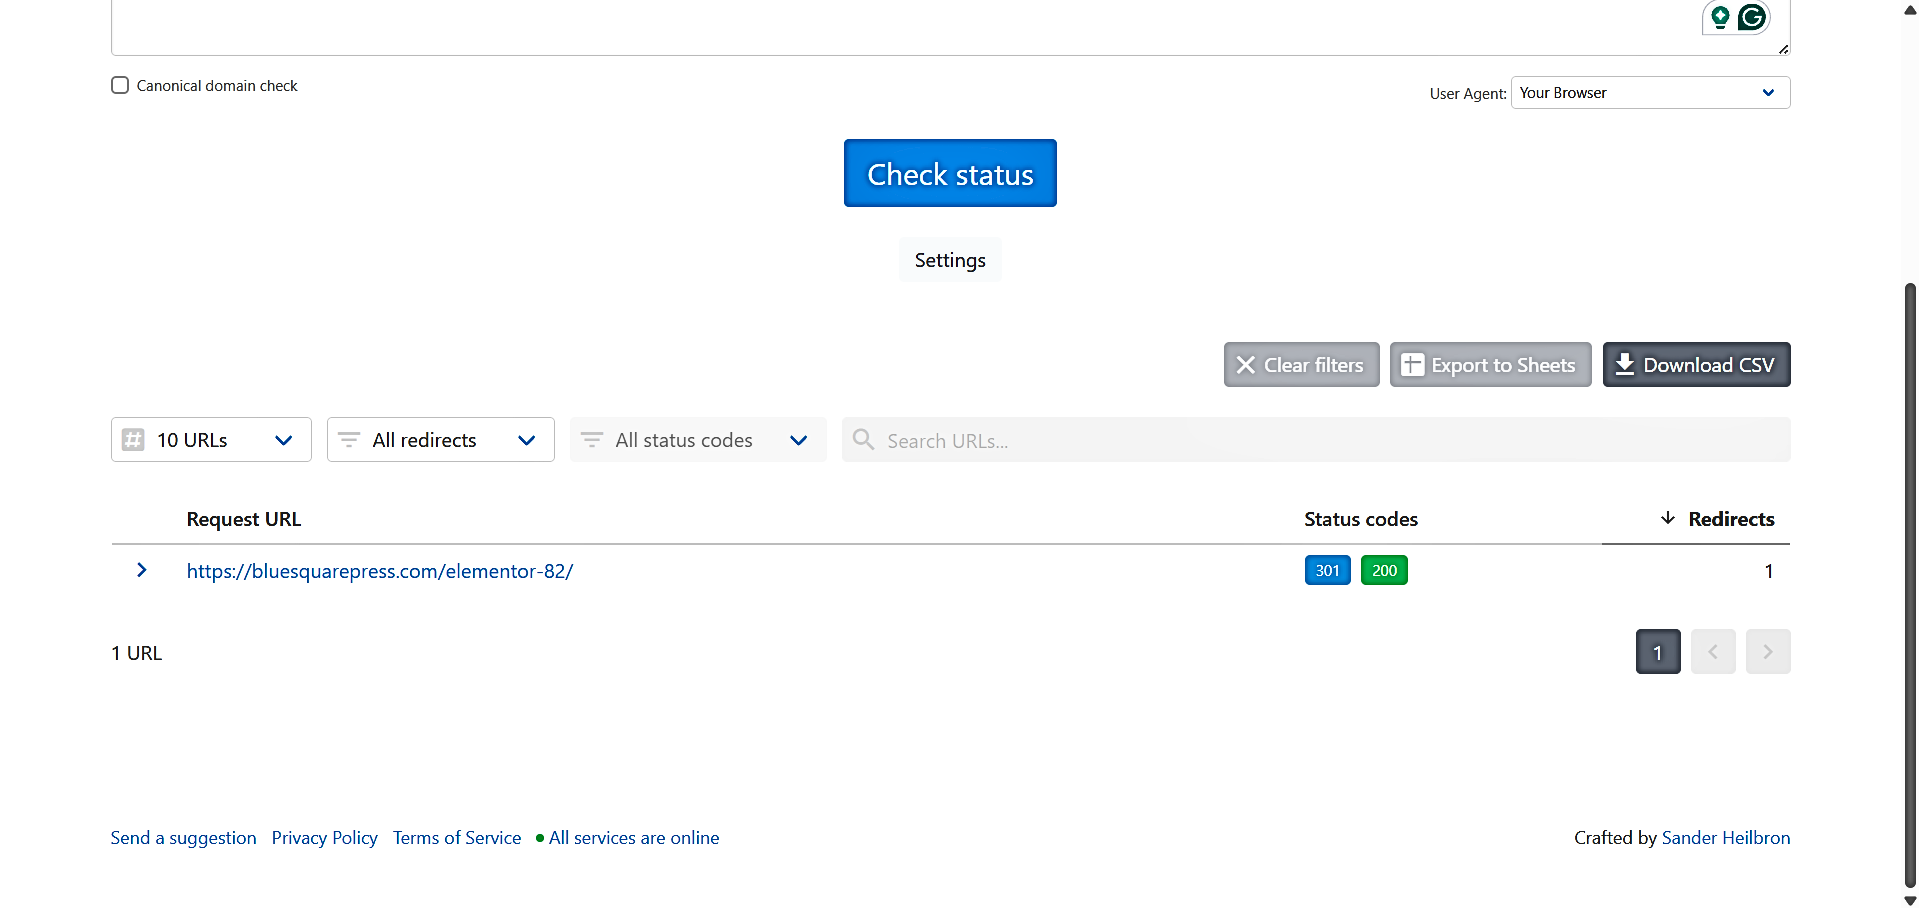
Step 4: Test the Redirect
Open the old URL in an incognito window, or use a redirect checker to confirm it returns a 301 Moved Permanently status code. Testing ensures the redirect works as expected before going live.
Apply Best Practices
- Redirect one-to-one whenever possible (from the old page to the closest relevant new page).
- Avoid redirect chains (A to B, then to C); redirect A • C directly.
- Confirm WordPress Address/Site Address is correct when changing domains.
Using SEO Plugin Redirect Managers
If you’re already using an SEO plugin, you may not need a separate redirect plugin. Many SEO tools include built-in redirect management, which can simplify your setup by keeping everything in one place.
- Rank Math includes a dedicated Redirections module that allows you to create, manage, and monitor redirects directly within the WordPress dashboard. It also supports logging and conditional redirects, making it suitable for both basic and advanced use cases.
- Yoast SEO Premium offers a redirect manager designed for ease of use. It automatically suggests redirects when you delete or change URLs, helping prevent broken links without requiring manual tracking.
- AIOSEO Pro provides a redirect manager with a straightforward interface and supports multiple redirect types, including 301. It also includes tools for tracking 404 errors, making it easier to identify pages that need redirects.
In most cases, the process is similar: enable the redirect feature, choose 301 (permanent), enter the old and new URLs, save, and test the redirect to confirm it works correctly.
Alternative Ways to Set Up 301 Redirects in WordPress
While plugins are the most accessible option, there are other ways to create 301 redirects in WordPress depending on your setup and technical preferences.
Using .htaccess for Manual Redirects
This method involves adding redirect rules directly to your site’s .htaccess file, which is used by servers running Apache or LiteSpeed. It allows you to control redirects at the server level, without relying on plugins.
This approach is best suited for users who are comfortable working with server files or want to minimize plugin usage. It can also be useful for handling multiple redirects efficiently or applying rules that affect broader URL patterns.
In practice, you add a redirect rule that maps an old URL path to a new destination. For example, a simple rule can redirect a single page, while more advanced patterns can handle entire folders or dynamic URLs. Since these rules are processed at the server level, they are generally fast and efficient.
However, this method requires caution. A small mistake in the .htaccess file can break your site or cause server errors. It’s important to back up the file before making changes, keep rules specific, and test each redirect after implementation. This method also does not apply to NGINX servers, as they do not use .htaccess.
Using Hosting Dashboard or cPanel Redirect Tools
Many hosting providers offer built-in tools for managing redirects through their dashboard or cPanel. This method provides a balance between ease of use and control, without needing plugins or manual file editing.
This option is ideal for users who want a straightforward way to create redirects while relying on their hosting environment to handle the technical setup. It is especially useful for common tasks like redirecting individual pages, entire domains, or enforcing HTTPS.
In most cases, you simply define the old URL or path, specify the new destination, and select a 301 (permanent) redirect type. The hosting platform then applies the rule at the server level, ensuring it works efficiently without additional configuration.
One advantage of this method is compatibility with different server types, including NGINX, where .htaccess is not supported. As with any method, it’s important to test redirects after creating them and clear any caching to ensure changes take effect.
Best Practices for Managing WordPress Redirects
Maintain One-to-One Redirects
Avoid redirect chains, where a URL passes through multiple redirects (A to B, then C). Chains slow page load times, confuse search engines, and reduce link equity. Always point the old URL directly to the final destination.
Keep Redirects Current
Update redirects whenever your site structure changes, such as when pages are moved, merged, or deleted. This ensures that all traffic continues to reach relevant content without encountering broken links.
Use the Correct Redirect Type
Always use a 301 (permanent) redirect for pages that have moved permanently. Incorrect use of temporary redirects (302) can prevent SEO value from being transferred.
Test Every Redirect
After setting up redirects, verify that they work as intended. Use an incognito browser window or a redirect checker to confirm a 301 response and that users land on the correct page.
Monitor Redirects Regularly
Periodically audit your site for broken links, outdated redirects, or conflicts. Consistent monitoring ensures that both visitors and search engines are always directed to the right pages, preserving traffic and search rankings.
Setting up 301 redirects in WordPress is essential for preserving SEO value, maintaining website usability, and ensuring smooth site management. Understanding how and when to implement redirects correctly is critical. Following best practices, avoiding common mistakes, and regularly monitoring redirects help ensure a strong, organized, and search-engine-friendly website.
For WordPress users, we provide hosting optimized for peak performance. Our plans include LiteSpeed servers with built-in caching, fast storage, and resources specifically tailored for WordPress and WooCommerce, ensuring your redirects and your entire site run efficiently and reliably.
If you need help setting up 301 redirects or managing your WordPress site, our team is here for you. Contact us anytime at support@jump.bg for guidance and troubleshooting.