Plugins are one of WordPress's greatest strengths, because they add new features without the need for complex development. Sometimes, however, they are the very cause of conflicts, errors, white screens, critical messages or performance problems. In some cases they can even block access to the admin panel. That is why it is important to know how to disable them when you need to diagnose a problem.
In this article we will cover 4 proven methods for disabling all WordPress plugins — both via the admin panel and through FTP, the database or WP-CLI. This will help you quickly restore your site and identify the cause of the problem.
How to Disable All WordPress Plugins: 4 Easy Methods
It is worth knowing more than one way to disable plugins, because not every situation allows you to work through the admin panel. If you still have access to the dashboard, you can deactivate plugins in bulk from there. If you cannot log in to WordPress, you have alternatives through FTP/File Manager in cPanel, phpMyAdmin or WP-CLI. WordPress officially supports plugin management from the Plugins screen and points to manually renaming the plugins folder as a way to deactivate them when you do not have access to the admin area.
You can disable all WordPress plugins in 4 main ways:
- via the admin panel
- via FTP or File Manager
- via phpMyAdmin
- via WP-CLI
1. Disable All Plugins via the WordPress Dashboard
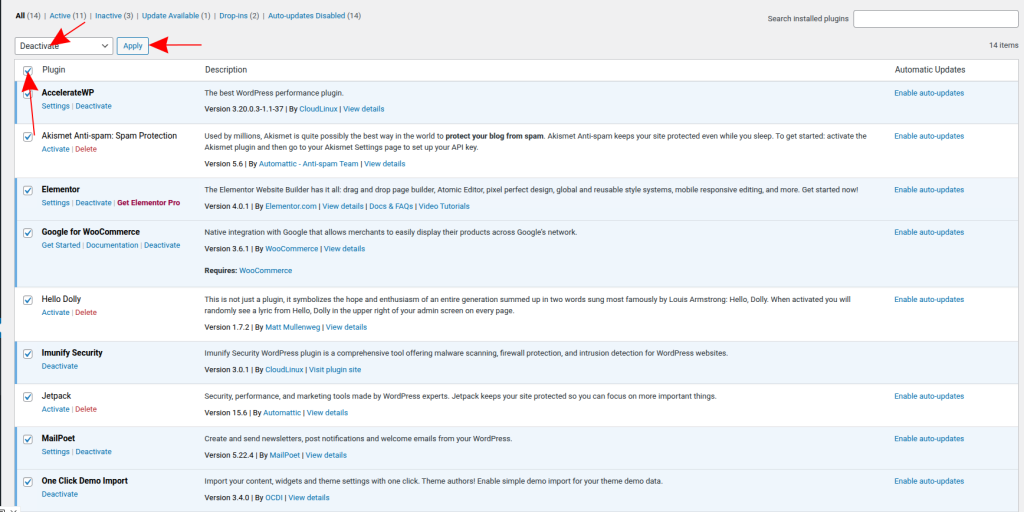
This is the easiest and most convenient method if the admin panel is accessible. WordPress allows bulk actions on plugins directly from the management screen.
Follow these steps:
- Log in to WordPress admin.
- From the menu select Plugins.
- Open the installed plugins page.
- Select all plugins using the checkbox at the top of the list.
- From the bulk actions dropdown select Deactivate.
- Click Apply.
This approach is most suitable when the site loads normally but you want to check whether a problem is caused by a plugin conflict. It is also useful when you are unsure exactly which plugin is causing the issue and want to temporarily disable all of them for testing.
You can then reactivate plugins one by one and check when the problem reappears. This is precisely the step-by-step approach WordPress recommends when diagnosing errors and conflicts.
2. Disable via FTP or File Manager
If you do not have access to the WordPress dashboard, the next reliable option is FTP. The official WordPress documentation describes exactly this method: you rename the plugins folder and WordPress automatically recognises that the plugins are missing and marks them as deactivated. The same principle applies when using File Manager in cPanel.
Step 1: Connect to Your Site via FTP
For this method you will need an FTP client such as FileZilla. FTP stands for File Transfer Protocol and allows you to connect directly to the server and your site's files.
You can usually obtain your FTP credentials from:
- your hosting provider's client portal;
- the FTP accounts section in cPanel;
- the welcome email sent when the service was activated.
If you prefer not to use an FTP client, you can apply exactly the same logic using File Manager in cPanel.
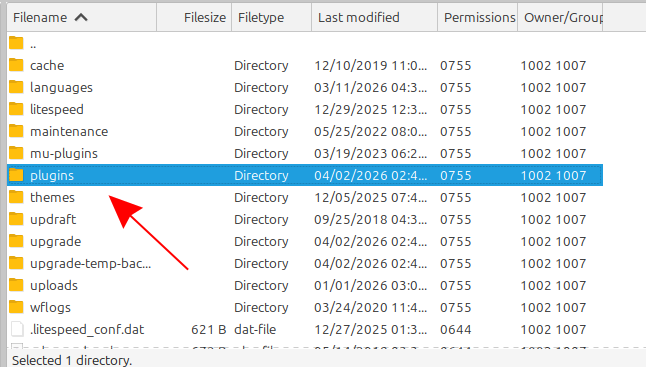
Step 2: Open the wp-content Folder
Once connected to the server, locate the root directory of your WordPress site. Inside it, open the wp-content folder.
Inside you will see several important directories, including:
- plugins
- themes
- uploads
For this method you are interested in the plugins folder.
Step 3: Rename the plugins Folder
Rename the plugins folder to something like:
- plugins_disabled
- plugins_old
- plugins.hold
WordPress uses this folder to load active extensions. When it is renamed, the system cannot find the plugins and marks them as deactivated. This is an established and officially documented method for manually stopping WordPress plugins when the admin area is inaccessible.
Step 4: Restore the Folder Name After Testing
Once you have finished your diagnosis, rename the folder back to plugins. This restores WordPress's access to the extension files.
Important note: restoring the folder name does not mean you should immediately reactivate everything. The best practice is to log in to the admin panel and reactivate plugins one by one to identify exactly which one is causing the conflict. WordPress specifically recommends this staged testing approach.

3. Disable Plugins via phpMyAdmin
This method is useful when you do not have access to the admin panel and prefer to work through the database. It is more technical and requires extra care, because any incorrect change to the database can affect the site.
Step 1: Log In to phpMyAdmin
Open your hosting control panel — for example cPanel — and select phpMyAdmin. This is a tool for managing MySQL or MariaDB databases through a browser.
Through phpMyAdmin you can browse WordPress tables and edit specific values, including those that determine which plugins are active.
Step 2: Select the Correct WordPress Database
If your hosting account contains more than one site, you will see more than one database. You need to select the one that belongs to your specific WordPress installation.
If you are unsure which one it is, open the wp-config.php file and find the value of DB_NAME. That is the name of the database WordPress is using.
Step 3: Open the wp_options Table
Once you have selected the correct database, look for the wp_options table. In some installations the prefix may be different, for example:
- wp_options
- abc_options
- site1_options
The key point is that the table name usually ends in _options.
Step 4: Edit the active_plugins Value
In the *_options table, find the row where option_name = active_plugins. This is where WordPress stores the list of active plugins for the site.
Edit its value and replace it with:
a:0:{}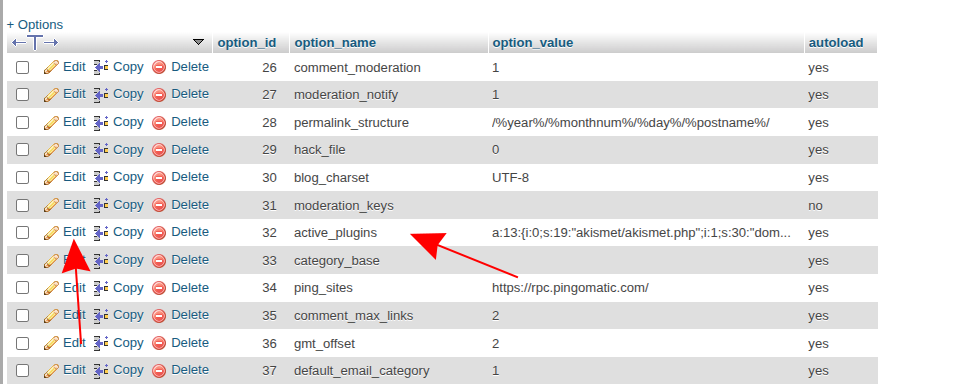
This serialised value means an empty array — in other words, no active plugins. This is why the method deactivates all extensions at once. You need to work very carefully here because you are editing the database directly. The approach is technically valid because WordPress stores active plugins in the active_plugins option, which is read through the options system.
Step 5: Verify That the Plugins Are Deactivated
After saving the change:
- Log in to WordPress admin.
- Open the plugins list.
- Check that all plugins are marked as inactive.
Once you have access to the site again, start reactivating them gradually to identify the source of the problem.

4. Disable Plugins via WP-CLI
WP-CLI is the officially supported command-line interface for WordPress and is very convenient for system administrators, developers and more advanced users. It allows quick plugin management without needing a browser. The official WP-CLI documentation supports the command for deactivating one or more plugins, as well as all plugins at once.
Command to deactivate a specific plugin:
wp plugin deactivate plugin-nameCommand to deactivate all plugins:
wp plugin deactivate --allThis is an excellent method in critical situations, especially if you are working over SSH and need the fastest possible solution. It is also suitable for automated processes, staging environments and servers that frequently require technical intervention.
It is important that commands are run from the directory where the WordPress installation is located, or that the correct path is provided via the relevant WP-CLI parameters.
Additional Tips for Safe Plugin Management
Regardless of which method you use, there are several important practices that reduce the risk of additional problems and help you work with more confidence.
Back Up Your Database
Before making changes via phpMyAdmin or WP-CLI, create a backup of the database. This is especially important when editing values manually.
A backup can be made via:
- cPanel backup tools;
- phpMyAdmin export;
- a WordPress backup plugin;
- a snapshot or backup system provided by your hosting.
If something goes wrong, you will be able to restore the site to its previous working state.
Re-enable Plugins One by One
Once you know the problem is plugin-related, do not enable everything at once. The best practice is to reactivate extensions gradually and after each activation test:
- the homepage;
- the admin panel;
- contact forms;
- caching;
- the editor;
- WooCommerce functionality, if applicable.
This makes it much easier to pinpoint which plugin is causing the conflict.
Need Help with WordPress Plugin Management? Check Out Jump.BG
If you would rather not handle diagnostics, deactivation and subsequent testing yourself, you can rely on professional technical assistance. The Jump.BG team can help with WordPress plugin problems, conflicts, critical errors, speed issues and general site maintenance.
This gives you several advantages:
- faster identification of the cause of the problem;
- lower risk of errors when working with the database or files;
- fewer interruptions for your site;
- more time to focus on your business.
Jump.BG offers 24/7/365 support, which is especially valuable when a problem occurs at an inconvenient time and you need a prompt response.
Learn more at WordPress Support.
Conclusion
There are several effective ways to disable all WordPress plugins, and the choice mainly depends on whether you have access to the admin panel and how much technical experience you have.
When you are familiar with these methods, you can stabilise your site more quickly, diagnose conflicts and manage WordPress with greater confidence.
If you have questions or need assistance, you can contact us at support@jump.bg or via the chat on our website.